In today’s episode we’ll be installing some of the final pieces of our pipeline with TheHive and Cortex. Along with TheHive we’ll need to install Elasticsearch from the 5.6 branch as a requirement of TheHive. Version 4.1 (expected in Q2 2019) will eliminate Elasticsearch as a dependency and instead use GraphDB.
I’m deploying TheHive 3.3.0 RC5 and Cortex stable v2.1.2.
RC6 is out but I received a 404 in Cortex for an invalid path when receiving requests from TheHive so no observables were able to be run. For that reason I’m sticking with RC5 for now.
April Update: I successfully upgraded my RC5 installation to the stable 3.3.0 release today and everything works perfectly.
Install TheHive & Elasticsearch 5.6
Add the repositories and keys:
echo 'deb https://dl.bintray.com/thehive-project/debian-beta any main' | sudo tee -a /etc/apt/sources.list.d/thehive-project.list
echo "deb https://artifacts.elastic.co/packages/5.x/apt stable main" | sudo tee -a /etc/apt/sources.list.d/elastic-5.x.list

wget -qO - https://artifacts.elastic.co/GPG-KEY-elasticsearch | sudo apt-key add -
curl https://raw.githubusercontent.com/TheHive-Project/TheHive/master/PGP-PUBLIC-KEY | sudo apt-key add -
Update and install our Java requirement:
sudo apt-get update
sudo apt-get install openjdk-8-jre
Install Elasticsearch 5.6.15 which is the latest in the repository we added:
sudo apt-get install elasticsearch
Modify elasticsearch.yml
sudo nano /etc/elasticsearch/elasticsearch.yml
cluster.name: hive
bootstrap.memory_lock: true
discovery.type: single-node
Set the service to auto-start and start Elasticsearch:
sudo systemctl daemon-reload
sudo systemctl enable elasticsearch
sudo systemctl start elasticsearch
Check for a response:
curl http://localhost:9200
If all is well we’ll proceed to TheHive installation:
sudo apt-get install thehive=3.3.0-0.1RC5
Pin Elasticsearch and TheHive
apt-mark hold elasticsearch thehive
Edit the application.conf file:
sudo nano /etc/thehive/application.conf
Uncomment #play.http.secret.key and change the password to any random string you want.
Set the service to auto-start and start TheHive:
sudo systemctl daemon-reload
sudo systemctl enable thehive
sudo systemctl start thehive
Check the website in a browser:
http://<TheHiveIP>:9000
You should see a database update message.

Hit “Update Database”, should only take a few seconds.
If you see a login box on first run and not the message above it means the connection to Elasticsearch is broken. Check the logs at \var\log\thehive
Otherwise, after the update completes, you’ll be given the chance to supply a Username, Display Name, and Password for the administrator account. Save and log in.
You can also check Elasticsearch for a new index named “the_hive_14”.
curl http://127.0.0.1:9200/_cat/indices?v
If you ever lose the admin account password delete this index to start over.
Install Cortex
Note that there are a lot of Python packages that get installed for the Analyzers. Don’t do this on a system where you need to manage packages for other applications.
UPDATE: Cortex 3.0.0-RC1 has now been released and I had some issues with it detecting my analyzers. Installing Cortex 2.1.3 rectified the issue.
Install Cortex on TheHive server:
sudo apt-get install cortex=2.1.3-1
sudo apt-mark hold cortex
Install some prerequesites for Cortex:
sudo apt-get install -y --no-install-recommends python-pip python2.7-dev python3-pip python3-dev ssdeep libfuzzy-dev libfuzzy2 libimage-exiftool-perl libmagic1 build-essential git libssl-dev
sudo pip install -U pip setuptools && sudo pip3 install -U pip setuptools
Install the Analyzers
Install the Analyzers by cloning from github and installing the requirements.txt for each individual Analyzer.
I cloned to /etc/cortex
cd /etc/cortex
git clone https://github.com/TheHive-Project/Cortex-Analyzers
Change permissions on the folder:
chown -R root:cortex Cortex-Analyzers
Install prerequesites for all Analyzers (run both lines as a single command):
for I in $(find Cortex-Analyzers -name 'requirements.txt'); do sudo -H pip2 install -r $I; done && \
for I in $(find Cortex-Analyzers -name 'requirements.txt'); do sudo -H pip3 install -r $I || true; done
There are some errors about satisfying requirements. We may run into this when running certain analyzers later on. I think the fix for this is to be more selective about which analyzers we install to prevent dependency conflicts.
Modify Cortex application.conf to point to Cortex-Analyzers directory:
sudo nano /etc/cortex/application.conf
Uncomment #play.http.secret.key and change the password to any random string you want.
Find the section for ## ANALYZERS and change the path to /etc/cortex/Cortex-Analyzers/analyzers
Start Cortex:
sudo systemctl enable cortex
sudo systemctl start cortex
Check the website in a browser:
http://<TheHiveIP>:9001
Update the database and create an admin user and log in, just like we did for TheHive.
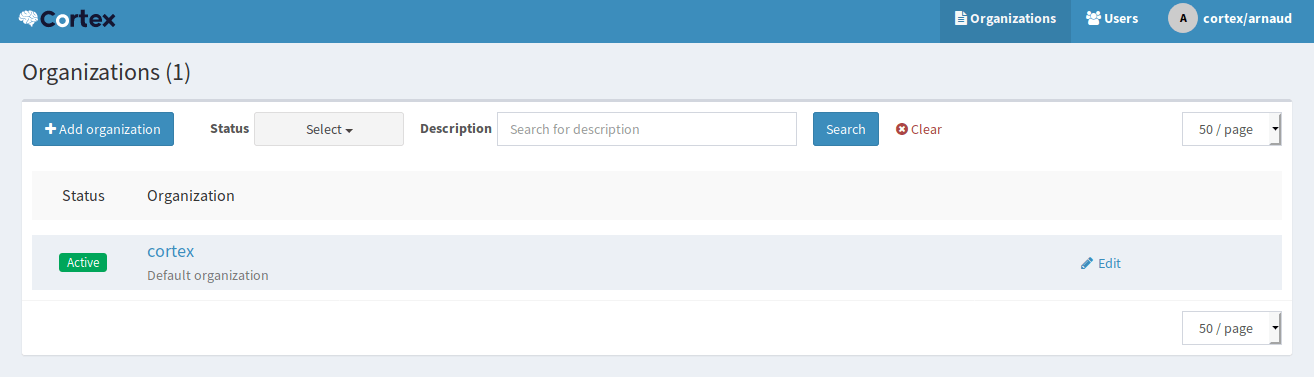
The way Cortex works is your current user has the ability to create organizations and users, but you must be logged in under an organization account in order to enable and manage Analyzers.
Create a new organization by clicking the +Add Organization button on this page.
Now switch to the Users tab and click +Add User
Assign the new user to the Organization you created and give them the OrgAdmin role.
After you save, click New Password for the user you just created and type in a password. Hit Enter to save.
Now logout and log back in as the new user.
Navigate to the Organization tab at the top.
Now click on the Analyzers sub-tab in the main body, not the Analyzers tab in blue at the top.
If Cortex is properly configured you should see your Analyzers. I have 113 available as of today.
Now enable some Analyzers. Accept all the defaults.
I’ve enabled:
Abuse_Finder_2_0
CyberCrime-Tracker_1_0
Cyberprotect_ThreatScore_1_0
DShield_lookup_1_0
MISP_2_0
URLhaus_2_0
Urlscan_io_Search_0_1_0
Other than MISP none of these should require API keys or further configuration. More on configuring the MISP analyzer below.
While we’re here, navigate to the Users sub-tab and create a new user for integration with TheHive. This user should have the read & analyze role.
This time don’t set a password for the user, instead click Create API Key and copy the key.
Now time for a test.
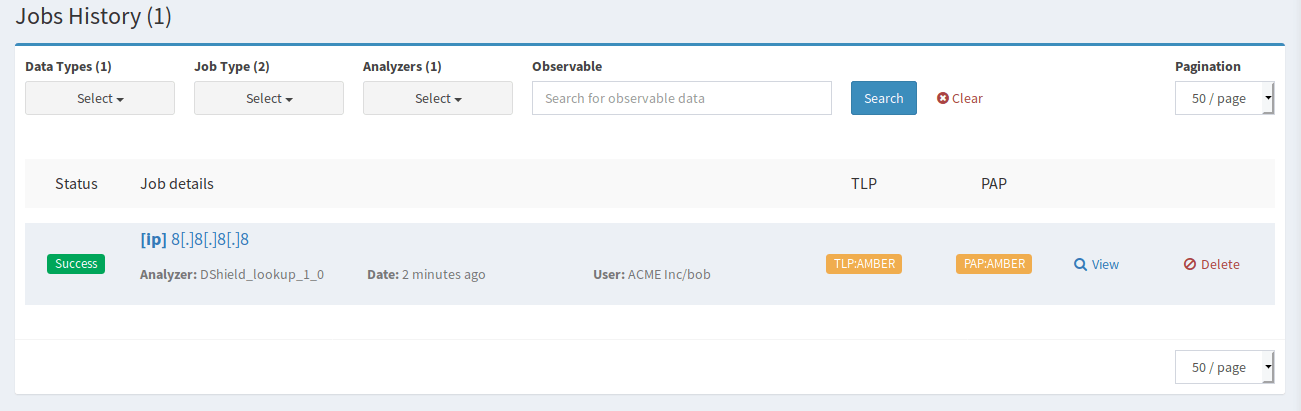
Click +New Analysis at the top of the page.
- Leave the TLP and PAP
- Change the Data Type to IP
- Add “8.8.8.8” as the data
- Check the boxes next to the Analyzers you’ve enabled
- Hit Start
You’ll be taken to the Job History page where you should see Success in green next to your job. Click the View button to see a report.
Now that we know Cortex is working we can modify TheHive application.conf to point to Cortex:
sudo nano /etc/thehive/application.conf
Scroll to the bottom and find the #Cortex section:
Uncomment play.modules.enabled += connectors.cortex.CortexConnector
Add the API key and URL.
play.modules.enabled += connectors.cortex.CortexConnector

cortex {
  "CORTEX-SERVER-ID" {
    url = "http://127.0.0.1:9001"
    key = "wrXichGSPy4xvjpWVdeQoNmoKn9Yxnsn"
  #  # HTTP client configuration (SSL and proxy)
  #  ws {}
  }
}
Restart the server so both services come up fresh.
Test Cortex integration from TheHive.
In TheHive click on +New Case
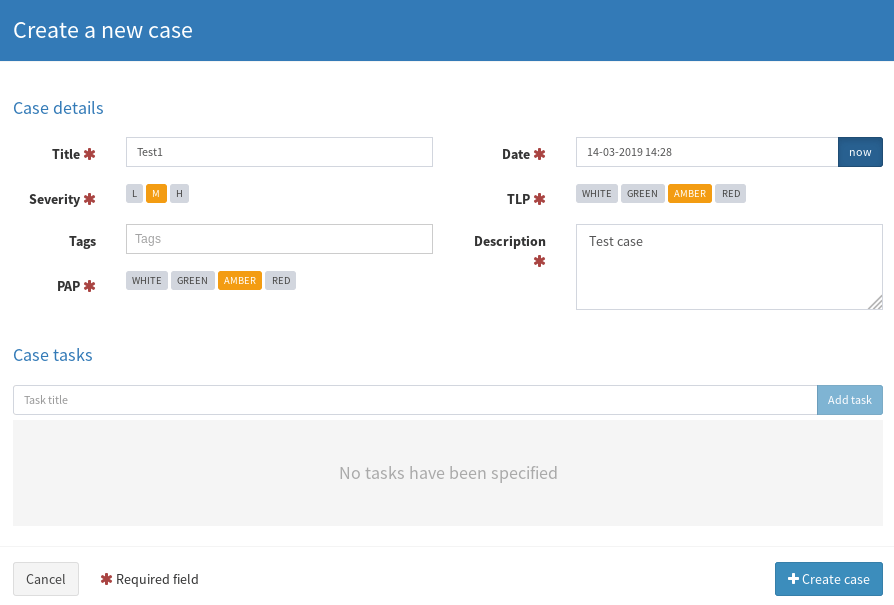
Give the case a name and description.
Now open the case by clicking the case name.
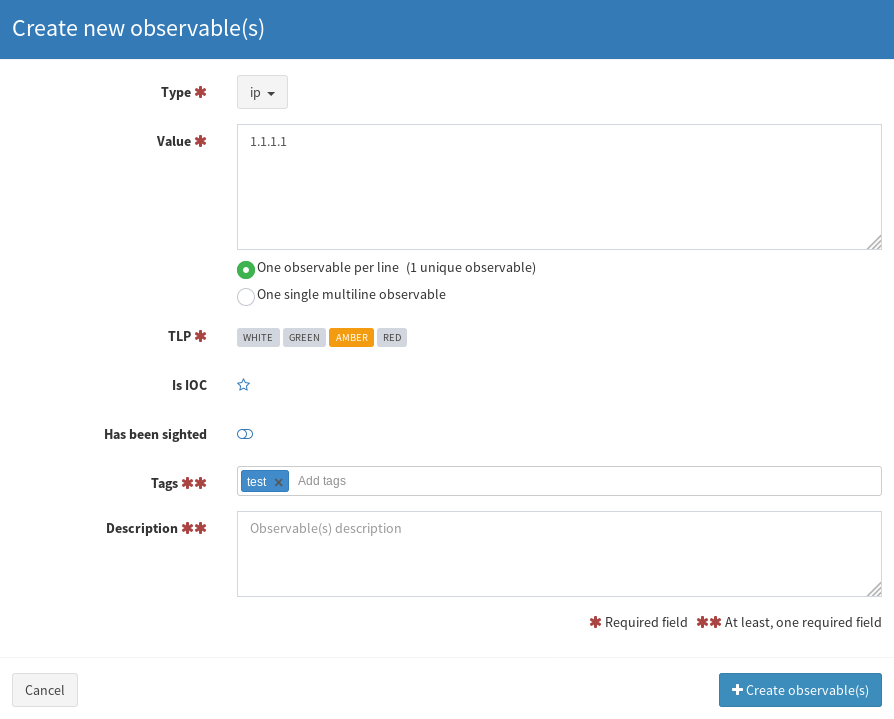
Click the Observables tab.
Click +Add Observable and make the Type = IP, Value = 1.1.1.1, and a Tag of “test”. You only have to supply a tag or description, not both.
Now in the Observable List, click the IP address. A new tab will open with information about the observables and you should see your analyzers available at the bottom.
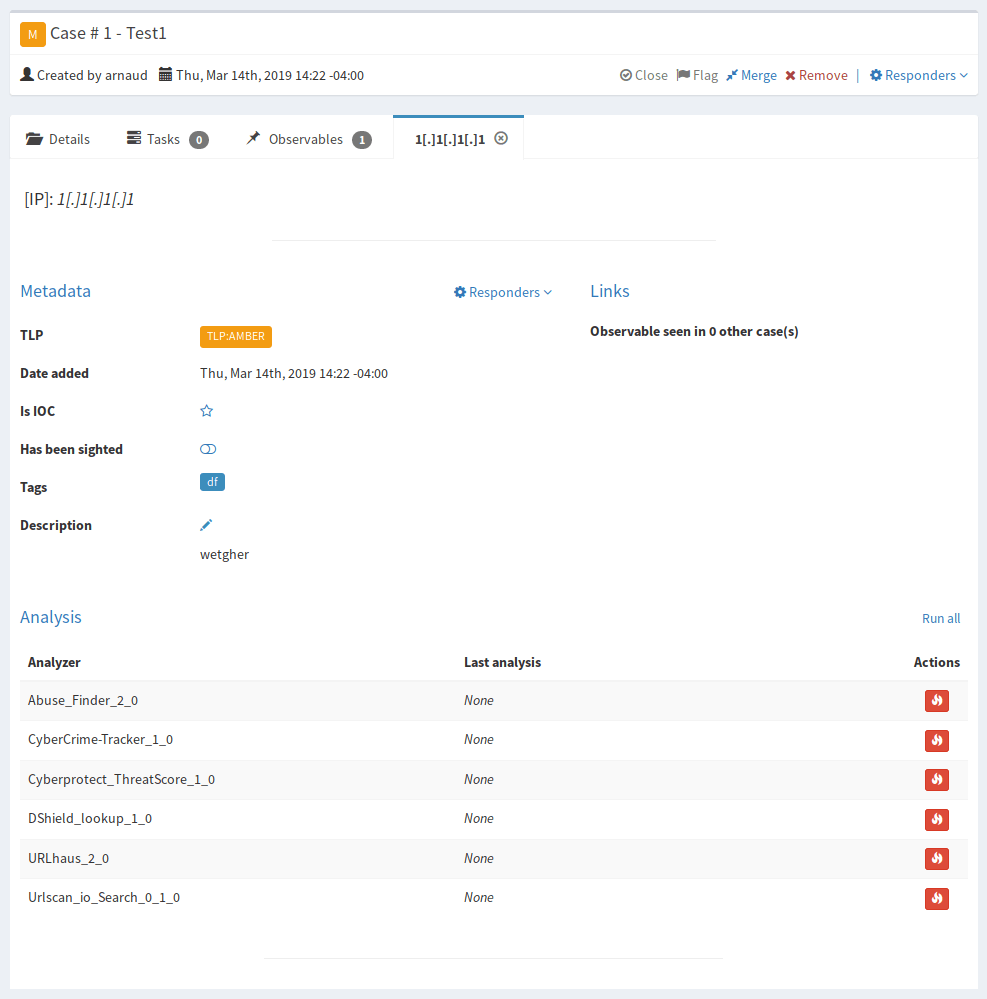
Click Run All
If you go back to Cortex you’ll see the Analyzers running in the Job History tab. Hopefully they all show success.
Back in TheHive the analyzers should all now have a date and time for “Last Analysis”.
Go back to the Observables tab and refresh the page. You should now see a list of tags under the observable. This is your enrichment and now gives you more actionable data to decide how to proceed.

Import Report Templates
Download the report template package from
https://dl.bintray.com/thehive-project/binary/report-templates.zip
Log into TheHive using an administrator account
Navigate to Admin > Report templates
Click on Import templates and select the downloaded package from above.
Now when you click on the Last Analysis time in the observable you’ll get a nice report with the results.

Enable MISP Integration
Go to your MISP Server webpage > Administration > Add User
- Give the user an email. I used cortex@admin.test
- Add user to the ORGNAME organization
- Role is
user - Uncheck all the boxes at the bottom
- Copy the user AuthKey
Go to Cortex > Organization > Analyzers
In the search box type “misp”
Enable “MISP_2_0”
- Give the MISP server a descriptive name
- URL = https://<MISP_IP>
- key = AuthKey from MISP user you created
- cert_check: False
Now navigate to the MISP server webpage > Sync Actions > List Feeds.
Find one of the feeds you’ve subscribed to and click the magnifying glass off to the right.
Select an IP from the list and copy it.
Now in Cortex, click +New Analysis, add a data type of IP, and paste in the copied IP.
Select The MISP_2_0 analyzer and run.
On the Job History page click “View” and you should see the name of the list you copied the IP from as well as any other information that list provides.
You can go into TheHive and add this IP as an observable to test from there as well.
We now have TheHive integrated with MISP and Cortex.
The last piece of the pipeline is to use ElastAlert to generate alerts in TheHive from events in Elasticsearch.