Policy Analyzer is one of the tools included as part of the Microsoft Security Compliance Toolkit, which Microsoft describes as “a set of tools that allows enterprise security administrators to download, analyze, test, edit, and store Microsoft-recommended security configuration baselines for Windows and other Microsoft products.”
Policy Analyzer specifically is “a utility for analyzing and comparing sets of Group Policy Objects (GPOs)”.
What this means is that it allows us to import GPOs from a variety of sources and compare them. This enables us to:
- Check for duplicate settings in a chain of policies being applied to an OU
- Compare your current GPOs to an older backup to see what’s changed
- Compare current GPO settings to Microsoft recommended settings
- Import a GPO backup from another Domain and compare the settings to your own
- Perform a GPO comparison for an Audit.
Installation
When you download your components, select PolicyAnalyzer.zip along with the most appropriate baseline set for your OS, and extract both. For this post I’ve selected the Windows 10 1607 and Server 2016 baseline.
In the Baseline download folder you’ll find the following:
- The Documentation folder has an Excel spreadsheet with more details on each setting. There are more than 2000 settings defined.
- The GP Reports folder has HTML reports of the GPOs like you would see on the settings tab in GPMC. Open these in IE.
- The GPOs folder contains the policy objects you’d import into the Group Policy Management Console or Policy Analyzer.
- Local_script folder contains a script to apply the baselines to the local policy.
- The Templates folder contains the admx files for additional settings in the GPOs.
- The WMI Filters folder contains a Windows 10 and IE11 filter for the GPMC.
The folder we’re most concerned with is the GPO folder. Here you’ll find GPO backups of the Microsoft recommended settings.
To use them with Policy Analyzer run PolicyAnalyzer.exe and click Add. Now select the File menu and Add files from GPO(s). Navigate to the Baselines folder and single-click the GPOs folder so that it’s selected. Click Select Folder.
The Policy File Importer window will now be populated with policies. Click the “Policy Name” column to sort by name. Now select groups of policies that are named similarly. For example for “SCM Windows Server 2016 - Domain Controller Baseline” there are four individual policy types to select: Computer, User, Sec Template, and Audit Policy. I select all four with the ctrl key and click Import. I now have to save this group of baselines as a .PolicyRules file. Type in a name for the group, keeping in ind that the name you type here is the name that will appear as the column heading for this group later on.
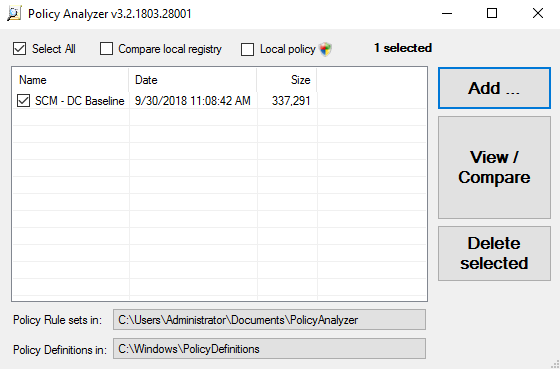
You’ll now have a single entry in your Policy Analyzer window. Check it and click View/Compare. A new window will open showing you the different policy names and applied setting.
What we need now is something to compare the Microsoft recommendations to.
Importing your Policies
Now you need to backup and import your Domain’s GPOs into Policy Analyzer
Open Group Policy Management Console and under your Domain name select the Group Policy Objects folder. Right-click the folder and select Back Up All and provide the destination folder.
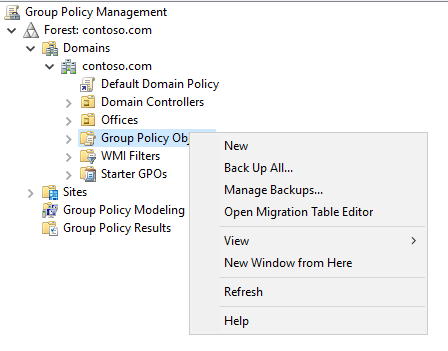
For those preferring to use Powershell the command is Backup-GPO -All -Path <dest_path>
Now go back to Policy Analyzer and follow the import steps from above, this time selecting the folder where your backups reside. In the Policy File Importer window you should now see all your policy names. Click the Policy Name column heading to sort by name.
I recommend importing them in individual groups by name. This means select all the policies with the same name together and import them together. This is tedious as after the first import is done you’ll have to go through the whole process again to import the second group, but it has the advantage of keeping the policies separate, enabling you to compare them individually. The alternative is to import all your policies as one group but then the settings can’t be analyzed by policy.
Comparing Policies
Once you have all the policies imported it’s time to compare them. Check the boxes next to the policies you wish to compare and click View/Compare. I’ll start by looking at my Default Domain Controllers Policy, Default Domain Policy, and Microsoft’s recommended Domain Controller Policy.

Here we see that my Domain Password Policy, with the default settings for a new Server 2016 Domain, are not consistent with Microsoft’s recommendations.
In the Viewer, conflicts are highlighted and clicking on an entry causes the Details Pane to show additional information and setting location. You can see only the conflicts and differences between policies by selecting these option in the View menu.
Next to the View menu is the Export option to export to Excel. I recommend exporting only the table and not the additional details.
Running a Remote Audit
I usually start by running a GP Link Report and a Domain Summary Report to get a sense of the scope of the project. I then use the GP Link Report to determine which Policies are within the scope and request a backup of those policies.
Along with a Group Policy audit there should be an audit of privileged group membership due to the number of User Rights Assignments to these groups in the Default DC Policy.
When you export the GPOs and analyze them outside of the Domain, the SIDs defined in the User Rights Assignments aren’t translated to names which makes identification harder. It’s usually best to just view the settings of the Default DC policy using GPMC inside the Domain where they still display with readable names. Select Show All from the Settings tab and highlight and select the entire User Rights Assignment section. Copy and paste into notepad and rename to a CSV. Opening in Excel will for the most part have all the accounts separated nicely by column for easy analysis.